Aug
26
2014
What is it?
Let me start with what a hyperlapse is (in case this is the first time you’ve run across the term.) At its most basic form, a hyperlapse is a timelapse with motion. When I say motion, I don’t mean panning, tilting, or moving the camera on a track: that kind of motion does not a hyperlapse make. A hyperlapse involves significant motion through an environment with the camera moving across multiple axes simultaneously. Hyperlapses are awesome, but creating one usually requires you to use a tripod, some fancy camera gear, and Adobe’s AfterEffects or Premiere with the Warp Stabilizer plugin. In short, you can’t create a hyperlapse on the cheap. Well, you couldn’t: until today that is. Today creating a hyperlapse is free thanks to Instagram!
Instagram just released a Hyperlapse App for iOS (I’m sure an android app won’t be far behind). What’s interesting about the app is this: while video stabilization normally requires a heavy amount of processing power, Instagram’s Hyperlapse correlates the iPhone’s gyroscope motion data with the captured video to cancel out motion (aka shake).
It actually works really well. Check out the video I created with it today:
Like
The app is dead simple. All you see when you open it is a record button that’s it. You hit the button to record and press it again to stop. When you hit stop, you’re asked how much you want to accelerate the video. You can choose from 1x to 12x. You also get a button to confirm or cancel. What’s cool is you get a preview of what the accelerated video looks like. Once you confirm you can then share the video to Facebook or Instagram, or you can save it to your phone.
It’s really a breeze to do. Just keep in mind: you don’t get any audio.
No Like
No YouTube or Vimeo sharing? I sort of understand Instagram/Facebook wanting to keep users within its walled garden, but it just doesn’t feel right not having sharing out to YouTube or Vimeo.
Also, if you happen to get a phone call while using the app, it locks up and becomes unusable. You have to kill the app and start over. Perhaps this is just specific to my phone ( I’d be curious to see if others are seeing the same thing.)
Should you Get it?
YES! First it’s free. Second, it’s simple. While it’s not perfect, it’s a lot of fun to use. I’m going to tool around Orlando with it and play around.
Here’s Instagram’s release video for Hyperlapse:
Aug
26
2014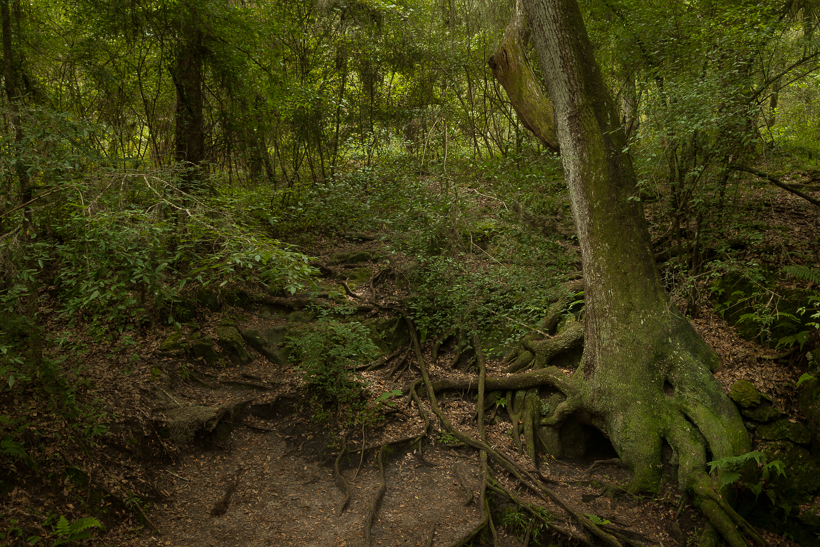
This tree within Central Florida’s Withlacoochee State Forest pretty much demanded to be photographed. I loved the root system and the scene. This was shot at the start of a 14 mile hike through the forest and even though I was eager to get started, there was no way I was not going to stop and spend some time here.
Incidentally, this tree sits at the mouth of a small cave near several other caves within a half mile area. I have some shots inside the caves I will be working on and posting. Right now I’m in the middle of writing a few reviews, but I’ll get the cave images on here!
Aug
25
2014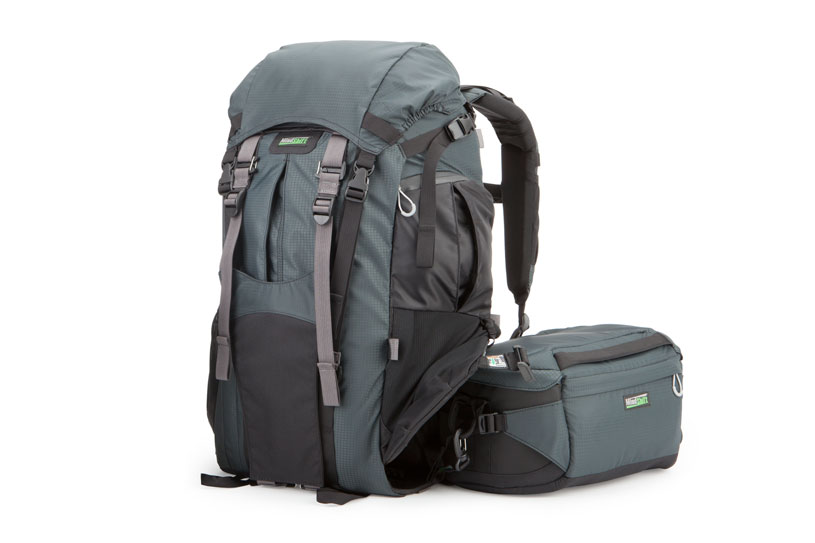
A consumer grade camera shoulder bag or backpack may be all you need for a day running around a city or perhaps while on a short nature walk. Getting your gear to a shooting location over difficult terrain, however, brings about a set of challenges an everyday camera bag just isn’t designed for. Chief among these are weight distribution, easy access to your camera, and sufficient storage space for your lenses, as well as, all the equipment you’ll need for a day or two off the grid – not to mention all the odds and ends we all have in our camera bags. Not only would a regular camera bag’s durability be in question, but so would its ability to protect your gear and give you the room you need.
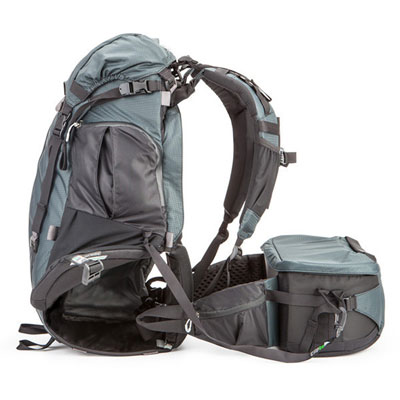
Enter the Mindshift Gear Rotation 180 Pro: a camera bag and hiking backpack all rolled into one designed specifically for the landscape photographer/adventurer. It features a unique two-compartment design comprised of a top section for storage and a belt pack to hold your camera. The belt pack, stored curiously inside the top compartment, can be rotated around to the front after unlatching a magnetic (arguably magical) latch (hence the name: Rotation 180).
Design: as a Camera Bag
The magical door latch
A rotating bag with a magnetic latch that fits inside another bag? It sounds like a recipe for disaster but it works brilliantly. Rotating out the belt pack starts with unlatching the door holding the belt pack inside the main bag. The latch is nothing short of amazing. You can unlatch the door with one hand and you don’t have to take the bag off your back to do it. All you need to do is reach around and slide the latch out. There’s no buckling/unbuckling or snapping apart or together.
Belt pack rotating in and out of the Mindshift Gear Rotation 180 Pro
Incredibly, you can close the latch back up with one hand (again while still wearing the bag). All you need to do is get the latch near the holder and it snaps back into place courtesy of the magnet incorporated into it. Not only does the latch close back up, but it’s also built in such a way that secures it together so it can’t unlatch on its own. It’s so easy I’ve even latched and unlatched the door while on the move (something you appreciate when you’re in the woods and want to put your gear away in a hurry)
Mindshift also designed the beltpack so it can even be rotated in and out even while the Rotation 180 Pro’s rain covers are on (there’s a rain cover for the main bag and one the belt pack). What all this adds up to is this: getting to your camera is easy; you don’t have to stop what you’re doing to get to it.
Careful design touches abound. The door holding the belt back in is spring loaded so you don’t have to move it out of the way after unlatching; it does so on its own. Mindshift was thoughtful enough to consider the possibility of you rotating the belt pack out without having it buckled around your waist. Without the belt back secured, it’s possible for it to fall to the ground. For this, Mindshift incorporated a safety clip-in strap connecting the main bag to the belt pack. If you do forget to have the belt pack buckled when you rotate it out, it won’t be able to fall. Also, the the straps holding all the zippers on the bag incorporate a hard plastic loop making them easier to open.
 Design touch: safety strap between the main bag and the belt pack |
 Design touch: hard plastic around the zipper loop |
While two lenses are usually enough for me, the belt pack can easily hold at least one more lens
Belt Pack Capacity
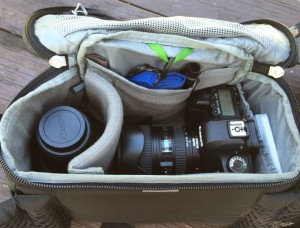
Ok, the door and latch are amazing but does the Rotation 180 Pro have room for your gear? The belt pack can easily carry a pro DSLR body with a 70-200 attached providing the hood is reversed. On a recent trip, the bottom compartment held my trusty 5DMKII with the 24-105mm F/4L attached (hood reversed) in conjunction with the 17-40mm f/4L and my Sigma 35mm f/1.4 A series lens. The image on the right shows my typical load-out: the 24-105 f/4L and the 17-40 f/4L.
The belt pack has a top pocket on the interior perfect for an intervalometer/shutter release and a battery. The inside of the pack has a pocket you can use to hold a polarizer and a few other odds-and-ends like memory card holder or camera strap). The front of the pack has a pocket that holds the belt pack rain cover.
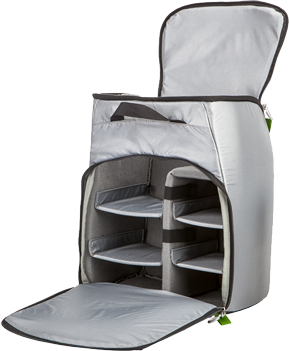
r180 Pro Insert allows you to carry a 2nd camera and lenses in the top compartment
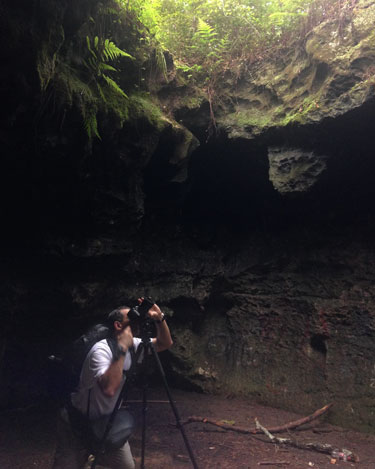
Here I was inside a cave using the Rotation 180 Pro
If you need more gear, you can spring for the optional ($59.95) r180 Pro Photo Insert. The insert will allow you to easily carry a camera with 70-200 f/2.8 lens attached providing the hood is reversed along with several other lenses. Just keep in mind the insert goes in the top compartment. All that gear will be adding a lot of weight and you’ll lose use of the top compartment for anything else.
That said, the Rotation 180 Pro can be unzipped from the back so you can get to any additional gear in the main compartment. To get to your gear, you leave the bag on with it buckled around your waist, undo the chest strap, and rotate the bag around. The bag naturally leans forward allowing you to unzip the back open. I appreciated this feature while standing inside a muddy cave looking up at a tree. I needed to get to the main compartment for my headlight, but didn’t want to put the bag down on the ground. I just rotated it around, grabbed what I needed, and zipped it back up.
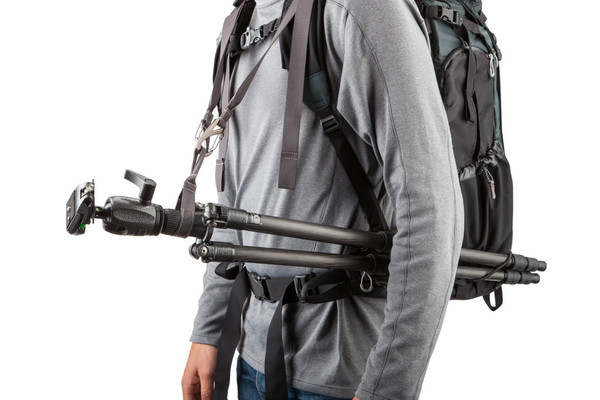
Tripod Sling
There are many bags allowing you to attach the tripod to the bottom. I’ve never liked this implementation. The weight never feels well distributed; the center of gravity always seems to be shifted to the side where the tripod head happens to be facing.
Mindshift did something unique with the Rotation 180 Pro. The bag comes with a removable sling you can use to carry your tripod. You can leave the sling at home if you’re not taking you tripod along. If you are, however, the sling attaches to the front of the bag keeping the weight close to your spine.
What’s also nice are the two small pockets on the front of the bag that open up to reveal compression straps to secure the middle and top of the tripod to the bag. Mindshift shows how all this works in the video below:
Tripod Suspension Kit
Tripod suspension kit lets you carry and setup your tripod quickly
One thing about the sling: it’s designed for you to carry your tripod as you trek out. When you get to your shooting location, however, you need to be able to carry, and get to, your tripod easily. That’s not something easy to do with it strapped to your back, but the optional suspension kit ($47.50) solves this problem.
The kit consists of three straps: two shoulder harnesses you can attach to the bag and a strap you to attach around the tripod’s center column. From there, you connect the shoulder harness straps to the tripod strap. This allows you to carry the tripod without using your hands. If you’re moving around (let’s say climbing a rock, for example) you can attach the tripod legs to a bungee cord on the side of the bag allowing you to carry the tripod without using your hands. Here’s another Mindshift video showing how this works:
Design: as a Hiking Bag
At 29.63 liters of storage for the top compartment and 7.67 liters for the belt pack. The Rotation 180 Pro is designed for a 1- to 2-night trip. It weighs 5.3lbs and is 13.5″ W x 22.5″ H x 10.5″ D. I’d call it a mid-sized bag. It is larger than a typical backpack (like Canon’s deluxe backpack), but not overwhelmingly so like a mountaineering pack.
Pockets & Compartments
The pleated front of the bag camera bag has enough room for a pair of pants and a jacket which is nice- especially if you start hiking early and need to layer up. Being in Florida, though, this compartment usually stays empty – at least in the summer as the mornings here start out hot and just get hotter.
The left side of the top compartment has enough room for a 100oz (3 liter) water reservoir, which you have to purchase separately. I went with the Camelbak Antidote Milspec reservoir. It’s a bit on the wide side for the bag, but works well; the 100oz Camelbak Omega is a good option also. I liked the milspec reservoir because it is ribbed and does not misshape as it gets full like a typical reservoir. The reservoir compartment has a strap to allow you to hang the water bladder and there is a slit in the compartment for you to thread the hose through. Also on the left side is a mesh pocket which you can use to carry bug spray or whatever items you might need. The mesh pocket gets a bit tight if the water reservoir is full, but it is handy. The ride side of the top compartment has a small pocket for storage which is ideal for the rain cover.
The Top Compartment
You’re not going to get the cavernous space you normally would get from a hiking bag since the bottom of the bag is dedicated to the belt pack. However, you can carry a cookset, camping stove, propane, water filter, and some food. The compartment has two pockets for smaller items. There’s also an optional top pocket ($32.99) that can be attached to the top of the compartment if you need to carry small items like energy bars. It can even be used to attach rope or a jacket.
A quick note on accessing the top compartment: not only can you unzip the back as I mentioned earlier, you can also open it up from the top as well.
Carrying a tent/Sleeping bag
The optional Attachment Strap kit ($16.95) comes with two 16” adjustable straps and one 39” strap allowing you to attach a tent/sleeping bag/whatever else you might need to the bottom of the bag.
Straps
The Rotation 180 has the full complement of straps, and strap adjustments, one expects from a solid hiking bag. Each shoulder strap can be adjusted at the top and bottom allowing for perfect positioning and weight distribution. The sternum strap moves along a rail for easy adjustment. The shoulder straps, bag back, and the belt back straps are thickly padded and very comfortable. All the straps (with the exception of the sternum strap) have an elastic loop allowing for management of strap excess.
The belt pack strap has a side pocket to hold smaller items. If there’s one thing I would improve on the Rotation 180 Pro, it would be this pocket. It could be a bit bigger and not so far to the left. Its size and positioning makes it difficult to use and get to. That said, it’ll fit a small flashlight and memory cards if needed.
Rain Cover
As I mentioned earlier, the Rotation 180 Pro has two. They’re both well made, but it’s a bit tricky to get the main bag’s rain cover on as it has specific attachment points inside the bag to allow for the ability to rotate the backpack in and out while the cover is on. It’s not that difficult to figure out once you’ve done it once or twice, but I’d recommend putting the main bag’s rain cover on a couple of times at home so you can do it quickly if you’re caught in a rainstorm. Putting on the belt pack’s rain cover is a breeze. Mindshift has a video showing how to put the rain cover on:
Price and Options
The Rotation 180 Pro comes in two configurations: Standard and Deluxe. Here’s a quick breakdown of what you get with each configuration:
Standard Edition ($389)
- Rain Covers
- Tripod Sling
Deluxe Edition ($499)
- Rain Covers
- Tripod Sling
- r180 Pro Insert
- Tripod Suspension Kit
- Top Pocket
- Attachment Straps.
Should you Buy It
At $389 for the Standard edition and $499 for the Deluxe, the Rotation 180 Pro is not cheap. The price is up there, and the accessories (if you go with the Standard Edition) are not cheap either. It’s not a bag you need for running around your downtown, but if you’re looking for a bag to entrust your gear to as you venture into the wild, the answer to “should you buy it” is a resounding yes – especially if you make multiple trips per year.
If you’re price conscious and are willing to carry a little less gear, you might want to consider Mindshift’s Panorama 180. It features the same rotating design and goes for $199. It’s smaller but still gives you many of the benefits of the Pro version.
The Rotation 180 Pro is comfortable to wear (even when loaded down with gear), has room for your camera and hiking gear, and makes using your camera a breeze when conditions are such that getting to your camera is not something you should have to struggle to do. The rotating design is so well implemented it’s a wonder no one thought of it before.
Where to buy
Mindshift Gear: Rotation 180° Pro
Amazon: Rotation 180° Pro- Standard
Amazon: Rotation 180° Pro- Deluxe Kit
B&H: Rotation 180° Pro- Standard
B&H: Rotation 180° Pro- Deluxe
Aug
11
2014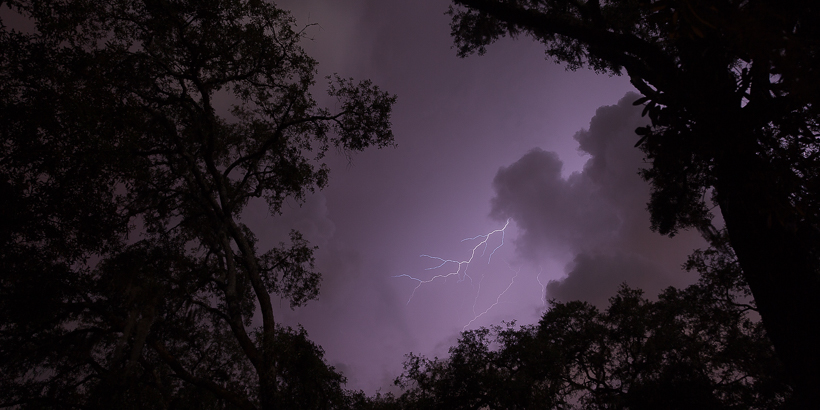
Jenni (Mrs. Elhajj that is) and I got to the campsite after a twelve and a half mile hike through the Withlacoochee State Forest and were treated to an amazing lightning storm. I don’t know about you but this lightning cloud just looks like Godzilla’s mouth to me. Jenni and I got a kick out of it.
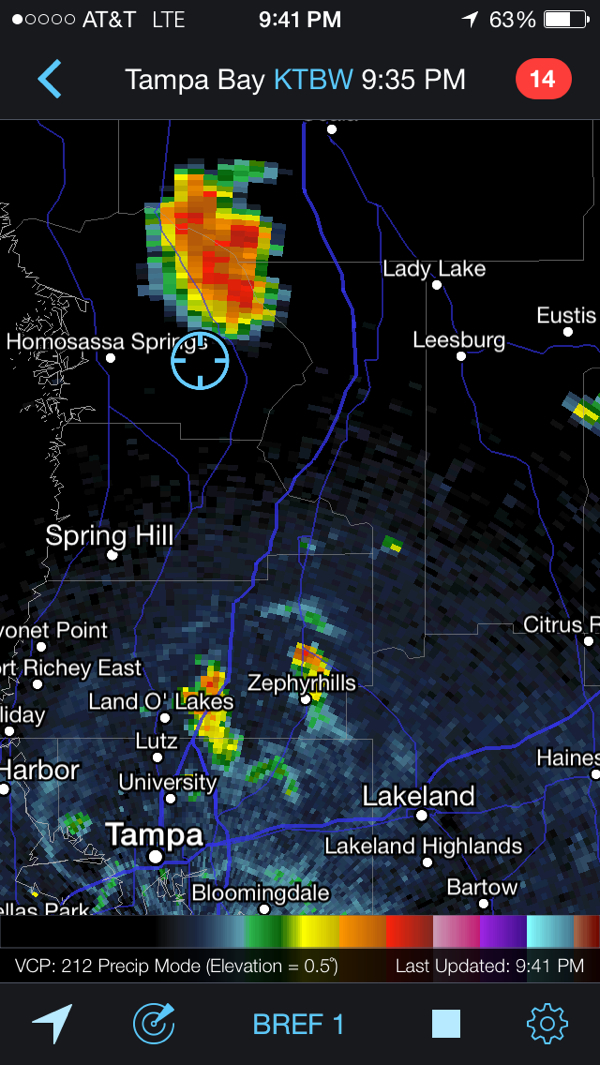
Storm Track (that little blue circle is us)
Back to the story, we hadn’t yet setup camp and the question was do we setup or just stay in the car a bit? We decided to just setup the tent (as the storm was still in the nascent stages) but quickly hopped into the car to check the weather radar and stay safe for a couple of minutes.
The thunder told us the strikes were very close, but fortunately we were just at southwestern edge of the storm (see the photo on the left from RadarScope) and it was moving northeast (and more importantly: away) from from us.
Seeing as we were just waiting in the car for a storm to pass, I figured the best thing to do was to take a large metal pole (i.e. tripod) with a metal box (i.e. camera) on top out into the storm to work on the easy task (yeah right) of focusing a camera in the dark.
I got the camera and intervalometer setup for 30 second exposures and jumped back into the car with the wireless remote.
This was the first spot I setup and I really liked the trees in the foreground. I ended up moving the camera later to capture some shots of lightning without the trees, but this is the shot I liked the best.
The storm did quite a bit of damage. We hiked into the path of the storm the next day and saw many charred and downed trees. Glad we didn’t get caught up in that!
By the way, I had about 60 or so images from the night so I decided to put together a very quick and dirty timelapse to give you an idea of what were seeing.
Here it is:
Apr
15
2014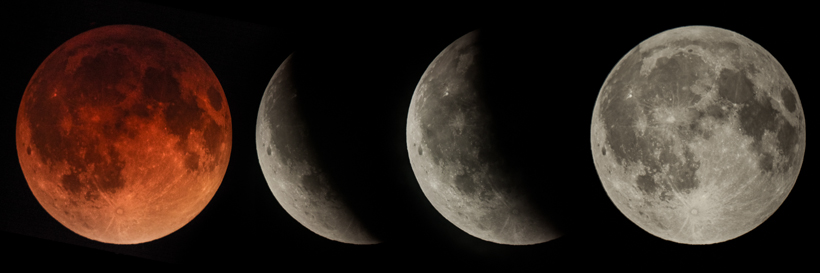
I set the alarm to wake me up as the eclipse was peaking and shot about 350 or so images. It was so nice out, I just stayed in the back yard , selected four shots for this composite, and did all the editing in the moonlight.
The Blood Moon was long gone by that point, but it was still a unique experience editing in the dark (really makes you appreciate those backlit keys!)
Shot with a Canon 5DMKII on a 10″ Schmidt-Cassegrain telescope at f/10.
Feb
14
2014
The sun sets, the sun rises, seasons change and time goes on. Even in nature, there is time for reflection.
I photographed this sunset back in the fall. There were two days of very still waters where the sky perfectly reflected on the lake. I remember seeing the sky turn red and rushing to get to the lake to photograph this.
Feb
03
2014
I photographed this last night at the Magic Kingdom and thought you all might enjoy it :) Someone said there was some Super Bowl thing going on, but from what I heard about the score, you might as well have been playing minecraft (you might have been better off playing minecraft anyway ;))
By the way, you can checkout my photographing fireworks tutorial to read up on how to create images like these; fireworks can be intimidating at first, but can be one the most straight-forward subjects to shoot (once you get the hang of them). You’ll need a couple of things (like a good tripod) and, if you can afford it, a remote trigger (I use an radio trigger, but just a simple wired one will do the trick).
I say all this then have to tell you that all I did yesterday was shoot handheld: camera, lens, that’s it. While I normally do carry a tripod with me, I wasn’t really planning on shooting the fireworks yesterday. The plan was to be home pretty early, but time can run away from you when you’re having a bit of fun!
Have a magical night!
Feb
01
2014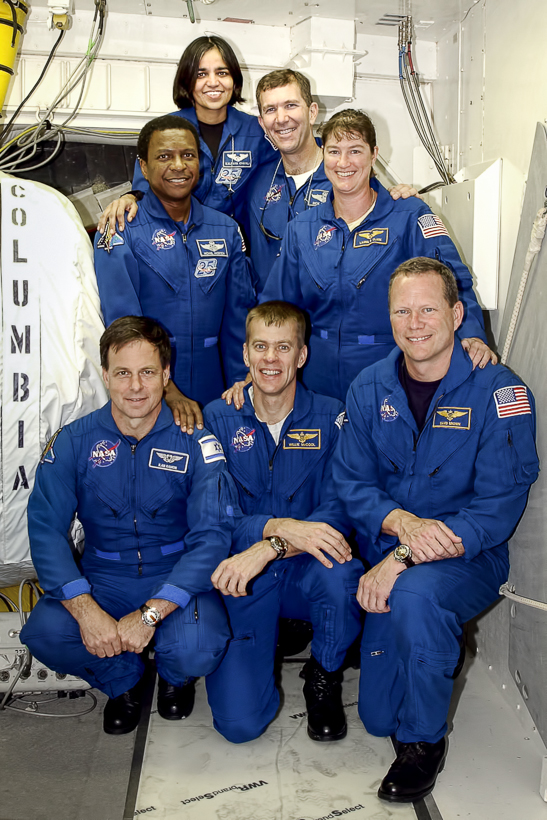
STS-107 crew; in front are (left to right) Payload Specialist Ilan Ramon, Pilot William “Willie” McCool and Mission Specialist David Brown. Standing in back are (left to right) Payload Commander Michael Anderson, Mission Specialist Kalpana Chawla, Commander Rick Husband and Mission Specialist Laurel Clark
8:44:09am, February 1, 2003. The Space Shuttle Columbia encounters the atmosphere after a short reentry burn.
Four minutes later, sensors show strains on the leading edge of Columbia’s left wing were higher than those recorded on previous reentries.
8:53:46am observers on the ground noted debris being shed as Columbia traveled at Mach 22.8.
8:59:32am The last transmission from the crew of the Columbia is received.
9:00:53am The main cabin was completely depressurized. 4 seconds later the crew cabin was seen disintegrating from the ground. The crew could not have survived any later than this point.
A few months earlier, a photo shows the crew posing together during a Terminal Countdown Demonstration (a simulation of the final hours of a launch countdown that serves as a practice exercise in which both the launch team and flight crew rehearse launch day timelines and procedures).
Kneeling in front are (left to right) Payload Specialist Ilan Ramon (the first Israeli astronaut), Pilot William “Willie” McCool and Mission Specialist David Brown. Standing in back are (left to right) Payload Commander Michael Anderson, Mission Specialist Kalpana Chawla, Commander Rick Husband and Mission Specialist Laurel Clark.
The original image (seen here) comes from the Kennedy Space Center Media archive. As in my other edits of the Apollo 1 crew and the crew of the Challenger, the image was edited as a tribute to the memory of the crew and as a thank you for their service.
Godspeed and thank you STS-107. You are not forgotten.
The wikipedia entry here was used as the source for this blog.
Jan
30
2014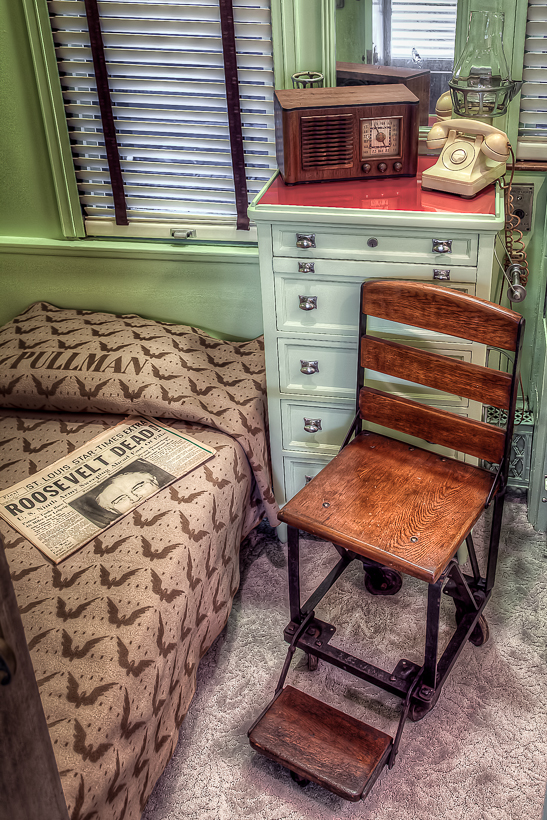
Today is FDR’s birthday. Seen here is his wheelchair inside the Presidential Stateroom of the Ferdinand Magellan railcar. FDR gave over 350 speeches and traveled tens of thousands of miles in the Magellan – with his last trip in it taking place two weeks prior to his death.
He shepherded the United States through World World II from the Magellan and undoubtedly spent many hours in this specially designed wheelchair – a humble seat for an immense burden.
FDR’s first trip in the Magellan was to Miami, Florida, so it is fitting that the Magellan is now part of the collection at Miami’s Gold Coast Railroad Museum.
Jan
28
2014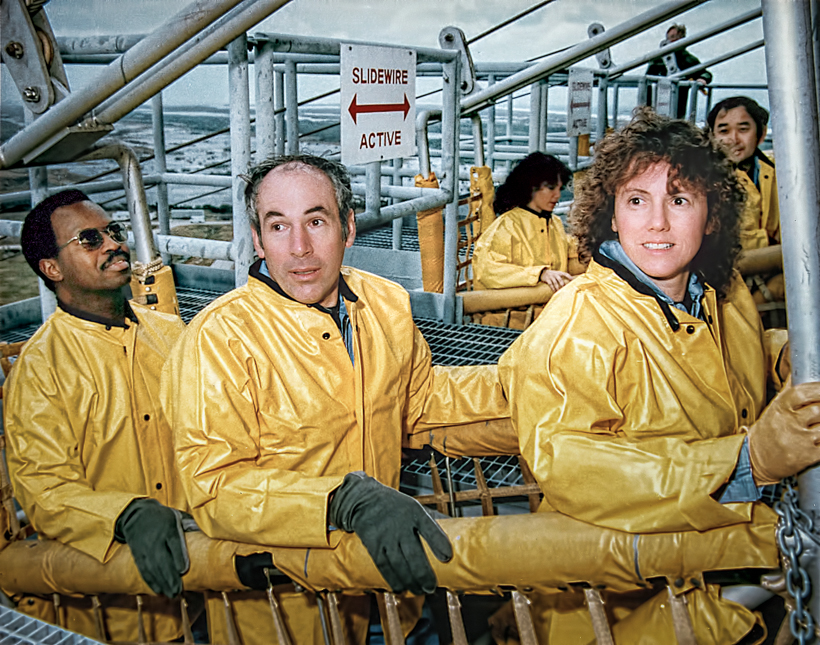
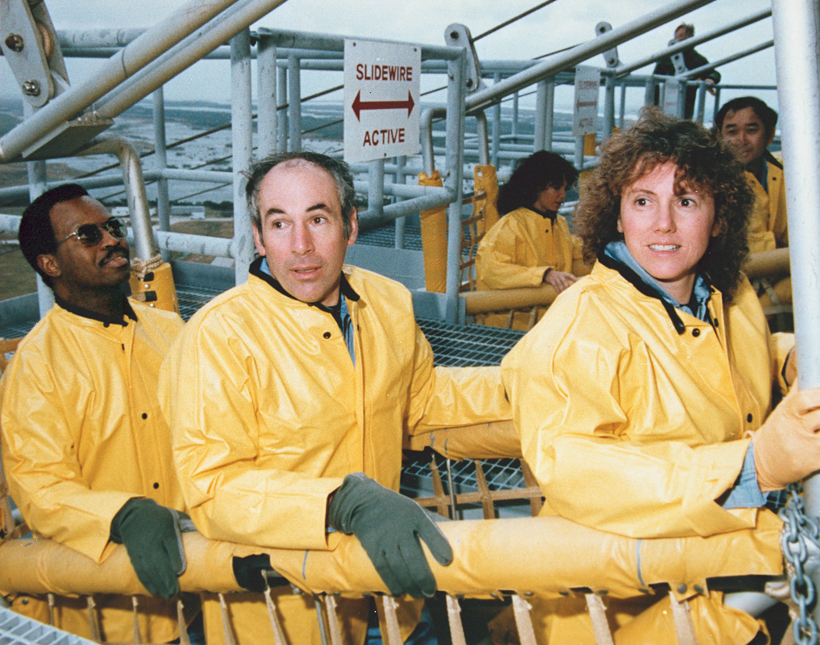
- Left to Right: Mission Specialist, Ronald McNair, Payload Specialist, Gregory Jarvis, Teacher in Space Participant, Christa McAuliffe. Directly behind them: Mission Specialist Judy Resnik and Mission Specialist, Ellison Onizuka.
January and Early February are a somber time for NASA. The Apollo 1 fire occurred on January 27th, the Challenger was lost on January 28th, and the Columbia on February 1st. I can’t imagine this time of the year for the those at NASA who worked with the astronauts lost furthering our knowledge of ourselves and the cosmos.
Two years ago, with this on my mind, I created a tribute to the crew of Apollo 1 – some part of me wanted to say “we remember you”. My hope was to bring the crews, their memories, and their images into today. This year, I decided to do the same for the Challenger and Columbia’s crews.
I try to find behind-the-scenes images of the crews and do not normally choose press photos. Unfortunately, finding source images, especially those of good quality which communicate the crew members’ personalities, is not always easy. Once I have the image(s), I take them into Photoshop and Lightroom for noise reduction, sharpening, tonal changes, and cropping. I also add my own small, but restrained, artistic touch to the source material(s).
For the Challenger crew, I started with the first image above taken during an emergency egress exercise 20 days prior to launch. The image resonated with me, but the original was quite poor and it did not show the full crew. I couldn’t, in good conscience, publish it alone. I very much wanted the whole crew to be represented, hence the second image. While it is a press photo, I do feel the personalities of the crew come across.
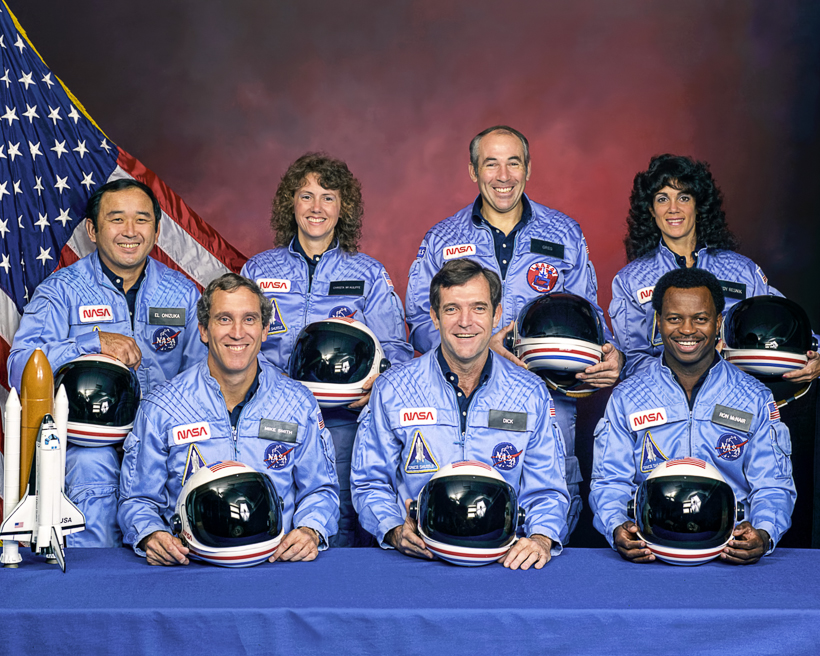
From the back row, left to right: Mission Specialist, Ellison S. Onizuka, Teacher in Space Participant Sharon Christa McAuliffe, Payload Specialist, Greg Jarvis and Mission Specialist, Judy Resnik. In the front row from left to right: Pilot Mike Smith, Commander, Dick Scobee and Mission Specialist, Ron McNair.
The before/unedited images Courtesy of NASA.